Showing posts with label tutorial. Show all posts

Sunday, July 9, 2023

Scene: Beach wedding book nook

A new scene finished!  This time, it is a wedding beach scene for a couple of friends that got married last summer.  

I started the construction almost the same as the First Communion scene, but with slightly different measurements, because I wanted to add more decorations and needed extra room.

The easiest part was cutting some pieces of black foamboard for the walls, floor and celing:


Next, I tried a sand wallpaper for the floor.  The idea was that the wedding is taking place inside a tent, but since it is in the beach, there is no need for hard floors.  I liked the effect very much:

Very nice sand color!

Checking if I have enough space for the decorations...

Next, I mounted the structure of the "tent":


Then, I started wallpapering the sides and the back.  For the back I chose this beautiful picture from Evona´s shop:

Super pretty!

The rest, as you can see, is just white paper:


Then I started the work on the table that would hold the wedding cake.  I bought a chess table very cheap.  When I got it, I already knew I was going to paint it white.  I assumed that the chess board was a piece of paper glued to the table.  I was wrong!  It was actually painted it, and my white spray paint did not cover it:


Oh my, what to do?  No worries!  Since it is a beach wedding, I thought of adding a nice tile board on top.  I simply printed it on cardstock, glued it and applied a layer of Mod Podge to make it shiny, as tiles are:  

Love the Mediterranean vibe!

Vòila!  No trace of the chess board!  The tiles come from Pixelmarket's shop (she was nice enough to feature my table on her listing!).  Time to check the progress:

So nice!

Love it!

It took me a while to retake this project (two bellydance shows, the remodeling of Kassandra's bedroom), so now the pictures are scarce.  But anyway, the only thing to do was decorate the ceiling.  I found a very cute tutorial on YouTube to make hanging jellyfish, so I made two.  And I decorated the walls with some posters celebrating the newly wed couple.  Also, I added some battery operated LED string lights that my mother gave me, leftovers from a Christmas tree that she did not want anymore:


So, I finally attached the ceiling and covered the outside walls with a tropical leaves wallpaper:


Looking good!

I also purchased a kit to make wedding boxes and bags, from the shop of Odin's Miniatures, and finally, the scene is finished:


Lovely boxes and bags!

The happy couple's names are on the wall ♥

Love that cake!  And the bouquet! ♥

So, so happy with how it turned out!

Friday, September 9, 2022

Tutorial: Easy blind curtains

I love to accessorize!  I think every miniaturist enjoys the decorating part of any new scene - I certainly enjoy it more than the building process, even though I do enjoy putting up wallpapers!

Since I have tiny windows in the beach hut, I wanted to craft some miniature curtains - blind curtains, in fact, that don't require any complex work with fabrics, for which I am totally useless.

This was my first time crafting blind curtains, so here is what I came up with.  I think it is a very easy process, even for newbies to the hobby.

Materials required:

  1. Your choice of fabric - I used a printable nautical fabric from Véronique
  2. Scissors / cutter
  3. Pencil
  4. Double sided tape
  5. Ruler 
  6. Fine sand paper
  7. Toothpics, or skewers - depending on how wide are your windows

1- Measure the width of your windows to determine the size of the rod you will be using.

2- Take your toothpick or skewer and mark this measure.


3- Cut to measure your toothpick/skewer using the cutter or an old pair of scissors


4- Sand the edges of the toothpick/skewer


5- Cut a strip of your fabric the width of your rod.  If you used printable fabric like I did, remove the paper backing.


6- Cover part of the strip with double sided tape.


7- Remove the coverings and place the rod at the beginning of the strip.  Make sure it is properly centered and straight.


8- Start rolling the fabric carefully, to make sure there are no wrinkles and that you keep the rod as straight as possible.  When you reach the end of the double sided tape, you are finished!  Trim any excess of fabric if necessary.


Congratulations!  You made your curtain!  

I have 4 windows, but for now I made just two curtains to try the technique.  Now that I have seen it works, more will follow!

Now get creative with decorations for the fabric: lace, trims, ribbons... Anything that you like!  Since this are for a nautical beach hut, I am leaving them as they are.  Have fun!

Sunday, July 26, 2020

Kassandra's DVDs collection

Today Kassandra and I starting unpacking some DVDs and Blu-Rays that just arrived.  Now that she had delivered a home-cinema setup, she wanted to have some entertainment for the children when they visit, and so we started organizing her collection.


"I have always assumed that vampires enjoy movies", I said.  "After all, they can be enjoyed anywhere; and these days of streaming, no need to even go out of the house to watch them".

"You are quite right, it is something thay we all in the family enjoy.  As you can imagine, I like to watch every vampire movie that comes out; some are sillier than others, but many are quite interesting.  Some of them even get a couple of things right about us.  We just watched yesterday "The Old Guard", which I thoroughly enjoyed.  They were not vampires in the strict sense of the word, but they managed to portray the vampire point of view regarding many things quite correctly.  I particularly liked Andy.  She reminded me of me.  Well, I was never a warrior like her, even though I have had my share of battles.  And the relationship between Joe and Nicky is one of the most beautiful I have seen in movies in a long time.  I hope we get to see a sequel."

"You know what a sequel is?"

"Ha!  I am educating myself in modern cinema.  I recently watched the Star Wars saga.  How fun!"

---------------------------------------------------------------------------------------------------

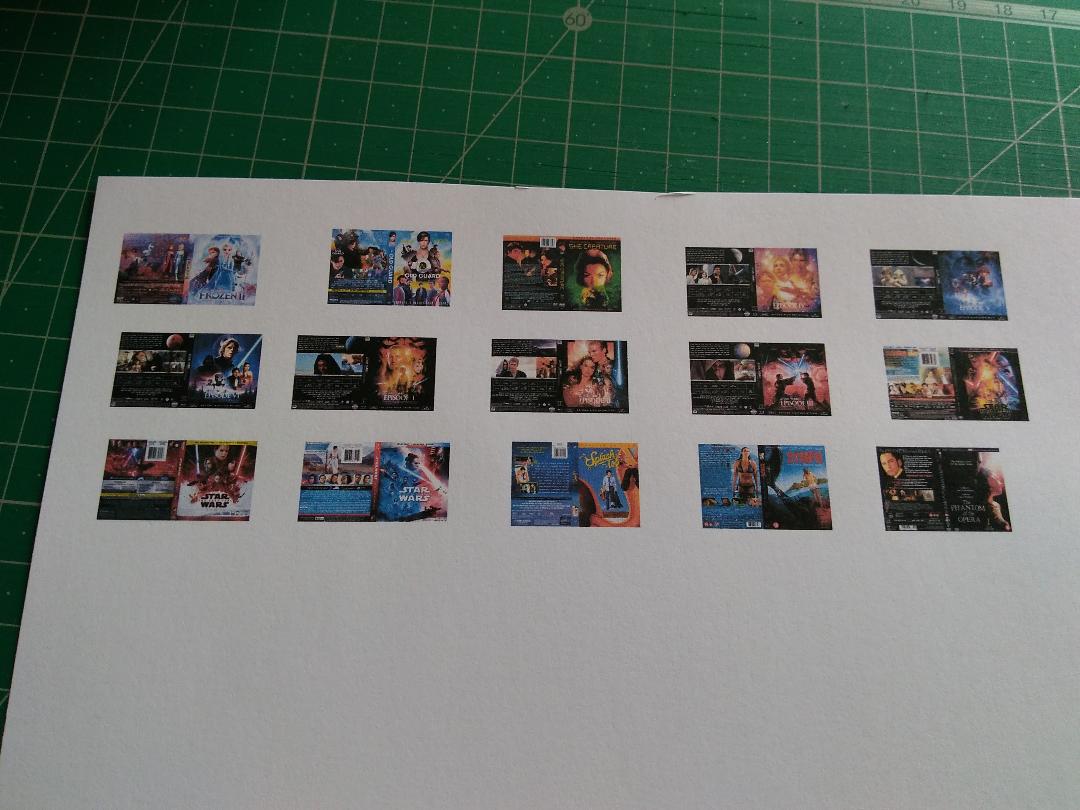
Since we all have our favorite movies, I thought it would be fun to include some titles in Kassandra's new home.  So yesterday I spent a good portion of the afternoon making DVDs and Blu-Rays for her collection.  They are very easy, fun and cheap to do!  Here is a tutorial for you to build up your own collection:

Materials you will need:
internet access o scanner
a piece of scrap paper
white regular paper
color printer
cello tape
scissors
Eva foam (blue for Blu-Rays and/or black for DVDs)
white craft glue
Optional: tweezers and toothpick

1- Gather up your covers.  You can scan the ones you have at home, or you can search for them on the internet.  The more modern they are, the more chances you will have to find them.

2- Use a photo program to reduce them in size.  For DVDs, you need a 1,5 x 2,2 cm image; for Blu-Ray, you need a 1,4 x 2,5 cm image.  If it is easier for you, I am happy to provide you with templates to use.  DVD and Blu-Ray.  Your image has to fit inside the black lines.  Also, make them 600 dpi.  That way you won't lose resolution.

3- If you feel lazy to find your own, here is my collection; you can see I favor fantasy movies and mermaids.  The Blu-Rays are on top, and the DVDs on the bottom.

4- Print them out.  


5- Cover them with a strip of cello tape, before you do any cutting.


6- Now you can cut them up.


7- Take the Eva foam of your preferred style and cut a strip the size of your film cover:


8- Take the cover and wrap it around the Eva foam, making sure to align the spine of the movie with the foam:


9- Cut to measure:


10- Make sure there is no foam sticking out of the cover.  If so, trim the excess:


11- Put a small amount of white glue on your scrap paper and use the toothpick to extend it on the back of the cover.  You can use the tweezers to hold it so your fingers will not get covered in glue:


12- Glue the cover around the piece of Eva foam:


13- Make sure all the corners are glued.  Hold it with your fingers for some moments while the glue sets.  You have you new Blu-Ray!  Congrats!!


Now get crazy!  The more you make, the easier to do they become:


I hope you enjoyed this tutorial and have lots of fun making your collection!

Tuesday, November 28, 2017

Having fun with Vectoria Designs projects

I have already mentioned Vectoria Designs sometime.  I have used several of their designs to make pretty boxes and other stuff for Kassandra's house.  What I did not know is that it could be so much fun working with paper.

I have become a susbscriber of Tinne's channel in YouTube, and we are updated frequently with new ideas, tutorials, sneak peaks and even freebies!  What's better than that?

I have been busy lately putting in practice some of the ideas she offers for projects.  They are very easy to do, and so rewarding!  Best of all, some of them are even good as little gifts for friends and family.

Here are some of the things that I made:

From this tutorial

From this tutorial

This is a project I thought of myself: the Chopin Liszt Shopping List (!):


As you can see, I even added a magnet to hang it on the fridge door

And this is what I am working on right now; a lovely industrial style box:


From this tutorial
 And after decorating it:


I still have a lot of work to do on this one; I have to make the metal corners, but give me time... 

I am sure you will find something on Tinne's channel that you may enjoy doing.  Go and have a look at her shop too!