Sunday, September 20, 2020

Free printable! Ballet calendar for 2021

I have been busy this weekend crafting a calendar for The Island room.  I have a cork board in which I wanted to hang it from.  So I made one for the remaining months of this year.

However, upon finishing it, I thought to myself, "why not make one for the next year, since I am already in the mood?"  Well, said and done.  I made one of those that you can change the page each month, but even though it is fully finished and functional, I am not sure it will hang well, because even though it is 1:12 scale, the paper is still 12 times too thick, and it looks a bit stiff:


Even though I love the design, it does not hang very well...
 
So I changed the style, and made one whose pages you have to tear off each time the month changes.  It is very easy to make, and you can find instructions on how to make it in this post - even though it is a different design, the process is still the same.

Once you have finished glueing the pages together, you only have to glue them onto the base with the picture - you should glue the base onto a strong cardboard so it won't bulge, or you can print the base onto photo paper, which is stiffer.

You can hold it in place with double-sided tape or dollhouse wax.

The theme is ballet, which I think will not look out of place in any dollhouse, but I have included an empty base in case you want to use your own picture.  

Here is the free 2021 calendar.  I used for the design the Print a Calendar site.  You can make several types of life-size calendars for your needs, or you can have fun designing your own in Big Hugh Labs, even making a small calendar for a CD case!  I am warning you, once you have tried their stuff you'll keep coming back for more!

Have fun making your own calendar!  Feel free to share it, give it as a gift and pass the file onto anyone (links back are nice too), but please, do not sell your creations or the file.

Wednesday, September 16, 2020

Free printable! Ouija boards and boxes

Given that I have a wonderful coffin bookcase, I was anxious to feel it up with Halloween goodies, and the best goodies are the ones you can make at home.

So I made some Google searches and found some really cool pictures of Ouija boards and boxes.  I spent yesterday afternoon cleaning them up and turning them into miniatures, so Kassandra has something to entertain her guests.

The board fits inside the box!
Here is a printie for you to make 2 set of different boxes, boards, instructions and planchettes.  Feel free to share them, give them as gifts and pass the file onto anyone (links back are nice too), but please, do not sell your creations or the file.

The Ouija boards I already had, from the time my shop was open.  The black box I recreated with the help of a picture of a vintage Ouija box from the 30s-40s.  I could not find a date for the blue and orange box, though.  I am not very happy with the planchettes; I included them so your set would not be incomplete, but I actually plan to make a planchette out of polymer clay.  Maybe you can do too, or you can use a jewelry finding instead (maybe one in a heart shape?).

Enjoy them!

Tuesday, September 15, 2020

Free printable! Halloween coloring books

One day closer to Halloween!

Who doesn't love it? Although this year is going to be not so much fun, with the pandemic and all.  Trick or treating has been suspended on many places, and we will not be able to celebrate with parties, movie watching with friends or your favorite activity, if it involves many people.

Lucky our dollhouses do not have such problems!  Kassandra has started already to plan a party, and she asked for help with the decorating.  Well, my first suggestion was to put up one of those fake coffins.  She was not pleased at first, with all the implications that could have, but when she saw the piece in question she changed her mind:


This phenomenal piece comes from Ever After Miniatures, a place I always recommend for fabulous books and other paper goodies.  The fun thing about this piece is you can use it with or without the shelves.  Kassandra was considering another one to put Mr. Fortunato inside, so he can enjoy the party too.

We started unpacking games and other knick-knacks to decorate, and Kassandra asked if by any chance did I have Halloween coloring books.  "I do not", I said, "but I'll be happy to make some for you".

Since I did not know she asked for herself or the children of the house, I made two, one for kids and one for adults.  I made them using images found on Google: 


The boxed game is also from Ever After Miniatures
In case you need some coloring books for your scene, I am happy to provide the file.  I hope you have fun assembling and displaying the books.  Feel free to share them, give them as gifts and pass the file onto anyone (links back are nice too), but please, do not sell your creations or the file.

Enjoy!

Monday, September 14, 2020

A little change in the bedroom

As Kassandra mentioned, she was very excited about a new floor for the bedroom.  I must admit that, even though I was not convinced, she found a real jewel for her chamber:

Before

After  


"Kassandra, I must say, you were right.  That is a very regal and very beautiful floor".

"Thank you, dear.  It is another of Evona's designs.  She told me that they are real tiles, photographed in a Teutonic Knights castle in Poland.  They were made in the 14th century.  Aren't they extraordinary?"

"They are indeed!"

Monday, September 7, 2020

Finishing up some details

As we were saying yesterday, here is the update on the door inserts:

Before:


After:


The fabulous window panel comes from the shop of Suzy. She has several models for you to choose from, along with lamps and printable furniture.

Also, I finished up the cellar.  Many thanks to my coworker Carlos for cutting up some wood pieces for me!

For starters, the ceiling.  I just used some craft sticks cut to measure, painted and glued to the ceiling paper.  I wanted to imitate visible beams, which I think is now trendy in decoration.  It just seem the natural thing to do on a cellar:


And it was super easy to affix it to the ceiling:

I love the look!
I showed the pic to Carlos, and he said that is precisely how his cellar is!  

Then, the fun part: walling up Mr. Fortunato!  Carlos help with that too by cutting to measure some wood for the fake walls:


All I had to do was sand them a bit so they would fit perfectly, and cover them up with the same red brick wallpapers as the rest of the walls:


Front
Back
 
Now for the fun part: setting up the stage for Mr. Fortunato!

Looks awesome!


This is what it would look like if you open the cellar door.  If you recognize the painting, you are extra awesome ♥  I love hidden references!
 And finally!  Setting up the residents: Mr. Fortunato and his friend the rattie! My very special homage to Edgar Allan Poe's "The Cask of Amontillado":

Soooo fun! Even more so with Halloween coming up!!
 I absolutely love how the cellar has turned out!  In case you don't know, the painting in front of the door is The Fallen Madonna with the Big Boobies by Van Klomp - this painting is featured in the British series Allo' Allo', and it makes for quite some adventures.  At some point, they hide it in a cellar ;)

Sunday, September 6, 2020

The living room is ready for furnishing

It took a loooong time for Kassandra to find some suitable wallpapers to start doing this room.  But yesterday was the day that was finished.

We started by the left wall, in which she wanted to have a bucolic scene, although with a modern design.

"This is very pretty", I said.  "It reminds me of those murals that they used to paint in the walls of palaces".

"Yes, that is why I like it.  I have found a lovely seller that has some wallpapers like those you are referring to, but they are very classic for a modern house like this.  But this one has a beautiful image, and it will combine very well with the other wallpaper."

And so, we put the mural in the first wall:


And then the second and third, with a matching grey and white stripped wallpaper:


Naturally, we had to use a template to match the space for the door, but we used the same one of the cellar, only wrong side up.  It was worth it, and it came out splendidly.

"It looks very nice."

"Yes indeed.  Jessica's wallpapers are abundant in this house."

"So, what's next?"

"The floor.  You are going to love it".


"Oh, it's luxurious!  It looks like Italian marble!"

"Isn't it gorgeous?  Evona made it.  The same artist that made the wallpaper murals we were talking about.  I am thinking of using another of her floors in the bedroom..."

"In the bedroom?  But, Kassandra, the bedroom is already finished!"

"I know, but when you see it, you'll understand why.  Let's set up the coffee corner!".

"Coffee corner?"

The jar contains real grounded coffee
"Oh my, that is something!"

"Do you like it?  I told you this house was going to be for entertaining guests.  My favorite humans love their coffee.  Now we can bring back the jellyfish aquarium and the TV set up."


"It's starting to look very cozy!"

"I have you to thank for that!  Come on, I want to finish the last wall!"

Then we embarked in the last wall.  The one with a door and a window.  Obviously we had to make a template; once done, we cut to measure and installed the wallpaper, and the curtains:


"I was starting to miss a little black in this house!"

"Very chic and modern!  Your tastes have changed a bit..."

"I would say that they have evolved.  I love the overall effect!  Tomorrow we have some details to finish.  But we can already supply the door with the doorknobs, that is not much extra work..."


"Fantastic!  And what is it that you want to do tomorrow?"

"I have had delivered some new door inserts.  The ones I bought were nice, but these ones are much better.  You'll see...".

Wednesday, September 2, 2020

The final touch for the ballet studio

This was the only thing that the ballet studio was lacking: a ballet barre!

I wanted to order a custom-made one, but in the end I finally decided to try and make it myself.  It was easier than I thought.

My coworker Carlos cut the wood for the bases for me.  Then I drilled some holes on them, as well as in the wood sticks:

My husband's drilling tool came in handy!

Then I used a couple of toothpicks to hold the side bars in place:


Then came the gluing, painting and staining part, and voilà!


I think it looks very nice!
The studio finally has all the furniture that it needs! 

Also, this beauty arrived all the way from Italy:


It is the child of Minimariba.  Her shop is full of beautifully made dresses and shoes.  Go check her out!  Also, see the tiny ballet box? That is a free printable from Zena Miniatures, so go and grab it right now!  And, this is the most amazing thing ever:


A box of convertible ballet tights!  Just when I think I cannot find anything else for the ballet studio, I find the most incredible things!  Also the creation of Zena.

Love the ballet studio!

Tuesday, September 1, 2020

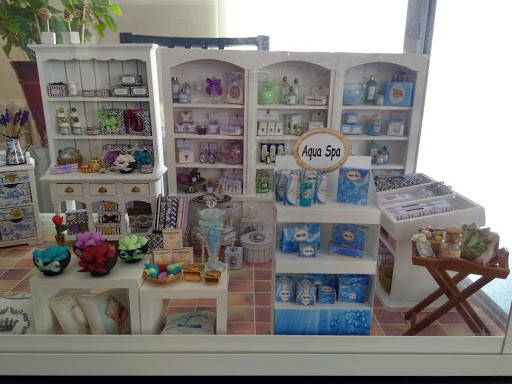
Interlude: Stand for the soap shop

The soap shop is a project that goes on and off depending on my mood.  

After the haberdashery shop was complete, I knew almost inside out Zenas Miniature website, and upon searching for printables, I found a lovely product line called Aqua Spa.  And it being in a beautiful shade of turquoise, I simply had to have it for the soap shop.  Last saturday I purchased it, and I spent a couple of days crafting a display stand to showcase the products with the help of Corel Draw.  It only took four tries (it would have been three if I had not messed up the cutting of the last one) for it to be just perfect.

Today I finished up the mounting of the boxes, and I love the finished look of the set up:

Lots of self-care goodies!


The shop is coming along great...
The aquarium with the jellyfish has moved to Kassandra's new house.  She says everybody should have an aquarium in their home.  Hopefully the work there will resume this weekend...