Showing posts with label wood. Show all posts

Tuesday, November 9, 2021

A project for two afternoons: makeup chest!

 Today I found Kassandra very happy, opening a gift that someone had given her.

"Hello! What is that you are opening?"

"Hello dear!  Oh, I am overjoyed!  The principal dancer of a ballet company with which I work from time to time has given this to me."


"Oh, how cute!  Is it a makeup chest?"

"Yes!  Oh, Erika is such a dear!  I love her so much.  I have seen her progress from a novice dancer to a great ballerina.  She deserves all the success in the world."

"I am sure she does.  And I hope you enjoy your makeup box!"

"I am ready to fill it up!"


 --------------------------------------------------------------------------------------------------

Fantasy apart, I saw a similar box in Facebook, and very much wanted to make my own.   I am in a phase now that I love what I call the "dancer pink" color, so I wanted the box to place it in the ballet studio.  I started with an ordinary box made of plain, untreated wood, and painted it pink:


Then I decided to cover the inside with a textured paper.  I was going to use a tan suede paper, but my husband said that looked too dark, and suggested something in ivory.  So I used the same fabric paper that I used in the natural history cabinet:
 
Trying on the patterns

Bottom side...

... and lid

Since it was a makeup chest, I wanted to include a mirror.  At first I thought of using a spare mirror I had in 1:144 scale, but it was very small, and I didn't like it.  So instead, I cut a piece of an acrylic mirror (the same type I used to hang in the ballet studio):

Dry fit to check the size
Wonderful!
 

I did not want to paint the bottom, so instead I covered it with a black suede paper, so it wouln't slide on the surfaces:

 
Then, embellishments!  So naturally, gold brass corners and a functional hinge (I love it!):


It looks perfect!

Next step, to craft some tiny makeup!  It was easier than I thought, with some help from YouTube videos made by talented crafters:


The lashes box comes from Zenas Miniatures; the two nail polishes I made following this video; the eye shadow pallete I got from here, and simply glued it to a piece of black Eva foam.  The gold nail file I made with gold textured cardboard, and the mascara bottle is just a piece of black paper glued around a toothpick that was painted with gold paint.  I covered the paper with a piece of clear adhesive tape.

It looks lovely in the ballet studio!


Monday, October 10, 2016

Using other scales accessories

My husband is a collector of other scale miniatures - mainly Warhammer, but also other brands.  Perusing for some stuff that he wanted to buy I found a lovely collection of wood crates and boxes:


Since I am working now on a shop, I wanted to have some boxes with freshly arrived stuff, and I loved the way these crates were designed.  Even though they are supposed to be for a Far West game, I think they look pretty standard for other purposes.  And for more fun, they were a kit.  They look awesome:


You can see they are obviously from a different scale, but they were so much fun to make, and so easy! The kit brings two of each, so if you need to fill a barn, an storage room or a wagon they will be great.


I will be using some to decorate the shop by putting stuff over them.  Some I will leave open to put stuff in, as if Kassandra was unpacking the merchandise.

What have you been up to?

Tuesday, July 28, 2015

Building a 1:144 dollhouse kit

My vampire tenant is building a dollhouse!

She has told me that it is a costume in her country that when a woman marries, she starts building a dollhouse that resembles the real house she lives in.  She says that she has not been able to find a castle that resembles her home, so she has opted instead for a little dollhouse, like the one I am renting to her.

She says she found the materials in a shop called MiniaturasMyE, and she is very happy with them.  She even shared with me some pictures:

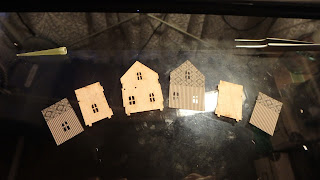
The kit still in the matrix
She said that even though it came with nothing to decorate, she is definitely adding stuff to the inside.  So she started by designing and cutting her own wallpaper:


The paper comes from Vectoria Designs.  She loves her Steampunk collections!  She says it was difficult to cut all the little windows, but she is happy how that turned out.  She glued the paper to the walls, and then the walls to the base and to themselves:


See the little shatters in the window?
The shatters were supposed to be put at the end of the project, but my lady said that she preferred to add them while the house was not having any material protruding, in case she needed force to make the glue stick.  That was not necessary, though, the glue is fantastic.  It came from The Miniature Garden.

Then she added the first floor base:


And then the roof:


She is currently deciding which color she is going to paint the ceiling, so that is all for now.  I cannot wait to see it finished!

She says she is still unsure about were she is going to put it.  Probably in the parlor, but we will see...

Tuesday, November 5, 2013

New design for The Illusion Lockets!

Remember that fabulous artist, Jim Anderson, who created The Illusion lockets after the one featured in the movie The Illusionist?  Well, Jim has made it again, and created something just beautiful: cremation ash lockets with secret compartiments.  It is the same design as his original lockets, but with a small compartment under the pictures, in which you can store small aids (such as pills or batteries), or the remains of a loved one. - he even designed a small black box for them.

I just found out about them after watching this video:


I think it is a marvellous invention.  I am going to start saving up for one.  As I already have one of Jim's lockets, I know for a fact that they are wonderfully made, and they are just beautiful.